Thursday, October 28, 2010

Portugese Pickled Carrots - conserva de cenoura - a recipe from the Algarve

When Astrid and I were in the Algarve region of Portugal a few months ago, everywhere we went restaurants and cafes served us these yummy, garlicky carrots. Served in little ceramic bowls, drizzled with fresh olive oil, it was the perfect nibble to accompany a cold glass of vinho verde or rose wine - and to dunk roughly torn pieces of fresh Portuguese bread into.

Ingredients:
2 cups sweet carrots, peeled and sliced in rounds
2 tbsp. apple cider vinegar
4 tbsp. olive oil
1 tbsp. parsley finely chopped
1-2 medium garlic cloves, finely chopped
1 tsp. sweet paprika
Salt - a pinch of sea salt/fleur de sel is best
Optional
black or green olives, with or without pits

Instructions:
1. Place peeled sliced carrots in a bowl and steam using microwave.  Zap until tender but not too soft. Microwaves vary, so 5 to 10min depending on microwave. *Note: Keep watch so your carrots don’t over cook.
Or simply simmer on the stove, in water to cover, until just tender.

2. Drain the carrots and place in bowl to cool slightly.

3. In another bowl, whisk together olive oil, vinegar, chopped parsley, garlic, paprika, salt.

4. Pour combined liquids over the carrots and mix gently - so not to break carrots, but mix well enough to coat all the slices. Taste for salt and spice and add to taste.

5. Add olives now if you wish and mix again gently.

6. Store covered, in refrigerator. Let the mix rest and absorb the flavours for an hour before serving or let the flavours mature and mellow longer; it keeps beautifully in the refrigerator for 3 days easily. If it looks a bit dry when ready to serve, just drizzle on a bit more olive oil, stir and serve.

Serve with crisp Portuguese bread, baguettes, or other crisp crusted bread for dunking into the garlicky oil . A cold bottle of vinho verde will complete the perfect snack.

Monday, September 27, 2010

Brownies - from scratch!

Perhaps the companies we have worked at are not typical of most UK firms, but it has been our experience that bringing baked goodies in to share with office mates is not typical and customary in the UK. When I first brought a batch of the classic American "Nieman Marcus $1,000,000 Chocolate Chip Urban Legend Cookies" into my office at KBR, the crowds went wild. Well, ok, we're all techies, all IT professionals, so yummy cookies are a natural along with coffee, lots of coffee. But then I sent in a share of the next batch with Alan (my husband) to his office and again, the crowds went wild. As time went on and we moved to other jobs the same phenomenon occurred - people delighted but mystified at why one would bring in home baked goodies for the office.

Well, it's an American thing.

Anyway, making those awesome cookies is a great deal of work, especially as I have to make them entirely by hand since I have no mixer here in the UK, and I wasn't making them very frequently. But people at Alan's office were making wingeing, mewling sounds of need so one evening I mixed up a batch of classic American brownies - from a mix box, of course. People loved them, and it was a perfect solution for home baked goody craving being dirt-easy to make. So when Alan came home from work on Thursday and informed me that the hints had progressed to stern cross-examination as to the expected arrival date of more snackies I told him to let his mates know he'd be bringing in brownies Monday morning. I planned to pick up a couple of boxes of brownie mix when I did my regular weekly supermarket run. Unfortunately I went brain dead and while I knew there was something I'd intended to pick up, I absolutely couldn't remember what. Until Alan asked me on Sunday afternoon when I planned to bake the brownies for work. Yikes! That's what I forgot to buy! But I knew I couldn't let the office staff down, they were all anticipating rich chocolaty brownies with morning coffee on Monday. So I airily announced no worries, I shall bake brownies from scratch as I had all the necessary ingredients in my cupboard storage. On the other hand, what I didn't mention was that I'd never actually made homemade brownies from scratch. So armed with a recipe from a trusted source, and scavenging the cupboards, I proceeded to bake a batch of what turned out to be the best damned brownies I've ever tasted!

Note to UK users - this recipe used cup and spoon measures, not weights. This makes life VASTLY easier.

If you don't have them, get yourself a set of standard measuring spoons and a set of measuring cups. Forget the misery of scales. I've given a rough guide to metric measures you can use.)

Ingredients:

4 large eggs
1 cup caster sugar (or 250g)
7 0z unsalted butter (200g)
6 oz dark chocolate - use a really good quality bar(150g)
1 cup plain flour (150g)
3/4 tsp baking powder (3.5g) I just used 1 level tsp because it was easier
2 small packs dark chocolate chips or chunks (100 gr bags UK, 4 oz bags US)

Equipment:

Baking pan - 8 x 10 x 1.5 inches (you can use a slightly larger pan but not smaller)
Greaseproof or Parchment paper
whisk
spatula - get yourself a silicone one as they are marvelous
Two bowls, pyrex or stainless steel, (1 large for mixing, 1 which can sit comfortably on top of the saucepan).
Saucepan with simmering water

Preparation:

1. Preheat oven to 325 F (170c or 160C for fan ovens)
2. Very lightly butter the baking pan (this will help keep baking paper in place).
3. Cut paper and fit to the pan leaving a small bit over the long sides for lifting cake out later and tucking the corners in keep a reasonably neat lining.
4. Lightly butter the bottom paper.

Instructions:

1. Put the eggs and sugar into the large mixing bowl and whisk together until well mixed. Set this to the side.

2. Break up the chocolate and put it into the heatproof bowl.
Cut the butter into chunks and add to the chocolate.
Place the bowl over the saucepan of simmering water.

3. Using the spatula, gently stir the butter and chocolate until they have both melted.
Then pour them into the egg and sugar mix while stirring the mix. It's important to stir the mix while adding the stream of melted chocolate.

4. Add the flour and baking powder to the mix and whisk them in, ensuring there are no lumps of flour.

5. Now stir in the chocolate chips and pour the whole lot into the baking pan lined with greaseproof paper.

6. Put the baking pan into the oven and bake it for 30 minutes.

7. Remove the baking pan from the oven; you'll notice that the brownies have shrunk slightly away from the sides.
Put the pan on a rack or heatproof surface and allow it to rest and cool for 10 minutes (ok, 5 if you're terribly impatient)

8. Take the brownies out of the baking pan by gently lifting on the extra paper you left on the long sides of the pan. Place the brownies on a tray and allow to cool another 30 min or until cool enough to handle. Cut into pieces and serve.

9. You can store the brownies in a tin or tupperware box at room temperature for a couple days - if they last that long! Or you can also wrap them individually in wax paper and place in a zip lock bag and freeze - that way you can take 1 out when you like and just let it come to room temp. Frozen brownies will keep for a couple of months.

Sunday, September 5, 2010

Creme Brulee


By request, I'm posting my Creme Brulee recipe. We recently bought a set which included ramekins, water bath, and ramekin holder. You don't need this, but it speeds up the process quite a bit. You'll see why. It's also an excuse to use a blowtorch.

You'll need few ingredients to make 4 individual brulees. Pre-heat your oven to 300 degrees. In a small saucepan, heat 1 1/2 cups heavy cream on a medium heat. If you have one and wish to use it, feel free to split a vanilla bean and add it. I'm unable to get my hands on one (I live in Chinatown, and work in Harlem. Neither place typically has vanilla beans readily available. Yes, there is a Fairway near me, but it's a pain in the ass to get to.). For the rest of us, add a teaspoon or two (up to you, I like adding a little more to have more of a vanilla taste to the custard) vanilla extract to the heavy cream. Meanwhile, in a separate bowl or kitchen aid (use the wire whisk) whisk together 6 egg yolks and 1/4 cup white granulated sugar until homogenous. When the cream is just hitting the boiling point (which will be about when you finish whipping together the yolks and sugar) remove from heat. Turn your mixer to a medium-high speed (this is important) and add a small amount of the cream (~1/4 cup-ish). Once it is incorporated, add a little more cream. Once that is done, add the rest of the cream, and continue to whip the mixture for another 10 seconds or so. Don't worry about foam.

Remove the mixture and pour into a separate bowl through a strainer. This will remove any egg shell pieces, as well as any pieces of egg which were cooked by the cream. Fill your water bath to about halfway. Place the ramekins in and fill each with the batter. Most recipes tell you to spoon off the foam. I find this a pain in the ass, as well as a waste of batter. Instead, I take my blowtorch and quickly wave the flame over the tops of the ramekins. It will make the bubbles disappear. You can do it two or three times. If you end up singeing the top a little, don't freak out, it's fine.

Stick the bath into your oven and leave in there for 50 minutes. Yes, 50 minutes. I've done this a number of times now (I have to justify the cost of the materials somehow) and it is always 50 minutes. Naturally, ovens differ, so check yours out at 45 minutes. I have not noticed a difference between it being located in the middle or top of the oven, so don't worry about it. How do you know it is underdone/done? Shake the bath gently. If the custard moves like a liquid, it is underdone. If it jiggles like Jello jigglers (which are slightly stiffer than classical jello) you're good. And yes, it is a very fast turnover point. At 45 minutes, it will be completely liquid. At 50 minutes, it is done.

Here is where the set is nice. Normally, you will need to leave the ramekins alone or very carefully remove them. My set has a wire holder which allows me to immediately remove the ramekins from the hot water bath, which allows them to cool more quickly. Generally, you'll want to wait until they cool a little bit before you stick them in the fridge (rule of thumb- don't stick piping hot items into the fridge or your milk will be chunky in the morning). Leave them alone for at leave a half hour- you want them nice and chilly. If you are planning on eating the creme brulee more than an hour or two later, leave them in the fridge. The custard will keep just fine, don’t worry. When you are ready to eat the dessert, take a teaspoon of granulated sugar and pour it on top of the first ramekin in a heap. Pick up the ramekin and angle it slightly, rotating so that the sugar coats the top evenly. This will ensure that you get a nice, even layer of perfect thickness. Excess gets poured on top of the next ramekin, and repeat. Once done, grab out your blowtorch.
Your first crème brulee will likely be over-scorched. I expected that I would need to move the flame rapidly and many times to get even heating. In fact, I have found that I get more consistent results if I move the torch slowly and evenly, giving the entire dish only one or two passes (one slow, one quick). Play with it- it’s really mostly a matter of practice more than anything. Oh, make sure you are not holding the ramekin when you use the blowtorch, and if you are afraid of setting your kitchen counter on fire, put foil down first.
Once done, the brulee’s go back in the fridge. Don’t try to eat it just yet- molten sugar + mouth = ouchie. Let it sit for ~1/2 hour. Eat within an hour or so. Any longer, and the sugar will start to soften and re-dissolve in the custard. Bon appétit!
Some thoughts: Have fun. Joanna and I decided to play with the type of sugar we used on the top. Most people use sugar in the raw or white sugar. I’m curious to try maple sugar. Last night, we tried using some black and harlequin sugars we had sitting around. This was interesting not just visually, but because the sugar grains were fairly large, the thickness and texture of the sugar layer was different. The black sugar was surprisingly boring and was very difficult to gauge the temperature. See below. Note: The tops are a little sloppy, because it is very difficult to make an even layer with very large grained sugar. Also, when using colored sugar, it will melt fully, but the dye stays put. So it looks unevenly coated, but it actually was very nice and even.
Oh yea. When adding the hot cream, make sure the mixer is fast. Too slow and the cream will cook the eggs much more- going fast will allow you to properly temper the eggs (raise their temperature without cooking). It always will cook the eggs a teeny bit, but this will minimize it.

Friday, September 3, 2010

Kick-ass Sauce

Yea, it's a silly name. But let me explain a little. My fiance is an ABC (american born chinese). She likes glazes on her meat- sweet glazes. I tend to dislike sweet glazes. They tend to be cloying and have little flavor. If I'm going to have a glaze, I prefer something savory or spicy. Joanna is more sensitive to heat in food than I am (I'm pretty sure there are entire nations that combined are still more sensitive to spicy than I am) so I tend to avoid making food we share spicy.

Seemingly unrelated, I have been on the search for many years for the perfect barbeque sauce. In my mind, I have a flavor which is what I think of when I think barbeque sauce. For many years, I have tried many, many different varieties from the store. Some would come close, but were always off. Not that some weren't excellent (and Choo-Choo's barbeque sauce will be missed, that's for certain) but they weren't quite right. Generally, they are too sweet, or have too much bullshit fake flavoring added, or I can taste the preservatives or whatever

No, I am not giving the recipe for my dream sauce. I never attempted to make it. I wouldn't even be sure how to start.

As I said before, I like a savory glaze, while Joanna likes sweet ones. I started playing with making my own glaze/barbeque sauce about a year ago. It took a lot of trials. The biggest hurdle was my shift in philosophy. I would make something I thought was pleasant, then my fiance would taste it and not like it, insisting I make it sweeter. Attempting to do so always gave something that tasted okay, but wasn't great. The problem was that I was either making a sweet sauce, or a savory sauce that had something sweet added, and it wasn't right. What I needed to do was to invent a sauce that by its very nature was both sweet and savory. And that's what I'm writing about.

I do not have exact amounts for this. I always adjust to taste. One thing to note- don't worry too much about it tasting perfect. I've discovered to my happy surprise that even if it isn't quite right, once I coat the burgers or ribs with it and cook them, it still tastes the same- fantastic. So give this recipe a try, I think you'll be pleased.

I use a medium saucepan on medium heat. To it I add ~1/2 cup of honey. I then add a cup of Heinz ketchup. You will need to add more ketchup later, maybe a quarter cup or so. You don't want the honey flavor to be too strong. Make sure to stir fairly frequently and make sure the mixture is homogenous before adding any other ingredients. The honey will take a little while before it dissolves into the ketchup, but it will, I promise. To this, add 4-5 cloves of garlic. I use my garlic press; I don't like my hands to stink for a week. Now, take wasabi powder (if you can get your hands on real wasabi root and a sharkskin grater, more power to you) and and in a small bowl mix with some water. Do not add the powder directly tot he sauce- it'll just dissolve in and be overwhelmed. I like to use about a heaping teaspoon or so. I also find it easier to add enough water so that it isn't its customary paste, but instead is more fluid. This allows you to add it more easily tot he sauce and it dossolves more easily. Leave the wasabi alone for five minutes to let the flavor develope, then stir into the sauce. Add a dash of tobasco sauce. This will make enough to coat a rack of ribs.

Be careful about overhating the sauce, or heating it too long. Doing so will enhance the flavor fo the vinegar in the ketchup, and give you an acidic sauce. Taste when you finish and add more of whatever ingredients you need. Again, don't stress out too much- it'll taste great. I don't add mustard- again, the vinegar content keeps me cautious. I tried it but didn't find that it added anything to the sauce. I've heard people express surprise that I cook my sauce, but I think it helps the flavors to really melt together, especially the garlic. If you find that you have added too much ketchup (it happens) you can easily just add more honey and such to taste.

Alternately- you can try sauteing the minced garlic into the saucepan, then add the honey and other ingredients. I cannot honestly say that I have noticed any difference in flavor or texture, so you may as well just make your life easier and add it later. Feel free to add a little salt and pepper if you like. I hope you folks will give this sauce a try- it is really easy to make, and delicious. The wasabi also (maybe just in my mind) makes the meat a little more tender and just compliments the rest of the flavors so fantastically.

Hm. I do have powdered chinese mustard. Might be worth playing with that a little and seeing what turns up.

If you like this recipe, please post and let me know your impressions. Or if you hate it, that's okay too. This glaze, incidentally, caramelizes beautifully. This last week, I madea rack of ribs with Joanna. We were both very hungry, and the ribs came our beautifully tender and juicy and just perfect. Joanna was dissapointed, however, that they really hadn't caramelized at all. She wanted to put them back int he oven longer, but I worried that they would dry out. So, I whipped out my blowtorch (what, your kitchen has no blowtorch?) and set about with it. Everyone ended up very happy.

Friday, August 20, 2010

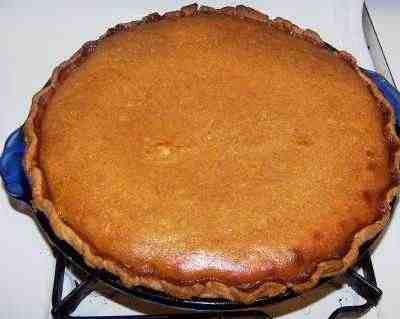
Pumpkin Pie


Basic Pumpkin Pie recipe - with notes for variations/options 


Note: In an ideal world, this pie should be baked in a
10 inch corning glass deep dish pie plate
Sadly, these once ubiquitous dishes are now rare and precious items.
If you have one or can find one, guard it well. Perhaps you can find one on eBay or steal one from your Granny. And btw there is a Zombie Death Curse on the bastard who stole mine from Astrid's last Thanksgiving dinner.

If you live in the UK, any sort of American pie plate may be difficult to find. Tesco and Waitrose used to carry them but I don't know if they currently do and that will also vary with location. The Waitrose in Canary Wharf, London had an excellent selection last time I was there.

Note: Where do you find pumpkin to make this pie?

The answer to this can be relatively simple or pretty complex - read on:

First you need to make some decisions - 

1. Are you going to use pumpkin or sweet potatoes to make this pie. Yes, you can use sweet potatoes instead of pumpkin. Nobody can tell the difference in the finished product. Trust me on this one. (This fact comes in handy in the UK where any kind of pumpkin may be impossible to find.)

2. If you choose to use pumpkin you need to decide fresh or canned.

Canned is easy - Get Libbys 15 oz can - even Tesco in the UK carries that. For some reason, Tesco's often stocks their canned pumpkin in the canned FRUIT section so check there as well as in the canned veg aisle. In the US it's available everywhere and frankly it's become the traditional standard for most people.

Or make a puree from fresh pumpkin - For this you MUST use a little 6" to 8" pie pumpkin (sometimes called a sugar pumpkin), you just need 1 to make either a 10" deep dish pie or 2 shallow dish 9" pies. Do not attempt to use the big Halloween type pumpkin. They are too watery and grainy/stringy and lack natural sugars. You can also use a butternut squash to make the puree - this is actually what is in canned "pumpkin". If you can get pie pumpkins, just cut it in half, scoop out all the seeds and fibers, then place cut-side down on a greased baking sheet. Bake at 350 degrees F (180 degrees C/160 Fan) for approximately 45 minutes to 1 1/4 hours (depending on size) or until easily pierced with a knife. When done, let cool a bit and then the peel should just lift right off. You'll need to puree the cooked pumpkin in a food processor or in a bowl with an electric hand-blender wand. Let the pureed pumpkin sit in a bowl for about 20 min and if any water seeps out, pour it away before using the pumpkin. (See why we tend to use the canned stuff?)

3. If you decide to use sweet potatoes and you live in the UK, you must use American sweet potatoes for this NOT African or unlabeled ones from god knows where. This is because the name may be the same, but the vegetable isn't. Tesco's sells American sweet potatoes under the name, "Carolina Gold" and they are lovely.

OK, on to the recipe

Preheat your oven to 375 degrees F (190 degrees C)
Place your oven rack in the middle or bottom third of the oven

Ingredients -

Pie crust - buy ready made in the fresh chilled/dairy section of your supermarket - in the US, I use Pillsbury's, in the UK ready rolled short crust (made with butter if possible). If you make your own pie crust, use your favorite. Make sure you have enough for 1 deep dish/2 shallow dish single crust pies.

(Here's a link with photos about crusts - http://startcooking.com/blog/154/Pie-Crust---Ready-Made )

Pie Filling -

3 large eggs
2 cups fresh pumpkin puree or 1 - 15 ounce can (425 grams) pure pumpkin
1/2 cup (120 ml) double or heavy whipping cream
1/2 cup (110 grams) light brown sugar - you can use white sugar if you prefer
1 teaspoon ground cinnamon
1/2 teaspoon ground ginger
1/2 teaspoon ground cloves
1/2 teaspoon allspice
1/4 teaspoon salt
Optional - a good splash of Scotch Malt Whiskey

Topping - whipped cream to top pie just before serving


First get your pie crust ready. Line the pie plate with the crust, crimp edges.
Option - sprinkle finely chopped pecans over the crust and press into the dough

Then make the filling:

1. In a large bowl lightly whisk the eggs.

2. Add the remaining ingredients and stir to combine. Taste and adjust, you may want to add more sugar or spices.

3. Pour the mixture into the prepared pie shell and place on a large baking pan to catch any spills. Note - you can cover the edges of the pie crust with aluminum (kitchen) foil before baking to prevent it overbrowning. If you do this, make sure to remove the foil after the first 20 min baking. I can't be bothered to fuss but it is a nice option.

4. Bake the pie for about 45 to 55 minutes or until the filling is set and the crust has browned (the center will still look wet). (A knife inserted about 1 inch from side of pan will come out almost clean.)

5. Place the baked pie on a wire rack and allow to set and cool about an hour. May be served warm or refrigerate if you like it cold. (We like it cold)

6. Traditionally this pie is served with whipped cream on top

Variations - I like the brown sugar but often I use a mix of white sugar and pure Maple syrup instead. I also use more spices than listed here because my husband likes a deeply flavoured pie. You can also use brandy instead of the whiskey. If you use something different, post a comment and let us know.

Thursday, August 5, 2010

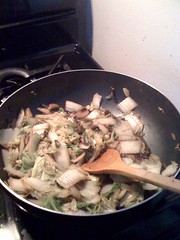
Mushrooms sauteed with Chinese cabbage

This isn't really a "recipe"; call it "tale of a lunch".

I mostly eat vegetarian at home - my roommate is vegetarian and does the bulk of the cooking, and I'm lazy enough that I'm perfectly content to let her cook for me (I do the dishes, in return.) So we do a lot of our shopping at produce markets, when we get the chance.

I'll cook for myself, of course, when I have to. I'm home during the day now and find myself scrounging up lunch for myself, and I've been getting tired of peanut butter sandwiches, so I popped my head in the produce drawer and saw a full head of Chinese cabbage and an unopened container of baby bella mushrooms. Lunch!

So, starting with:

1 head of Chinese cabbage
1 box of baby bella mushrooms

I assembled a few more ingredients after rummaging around in our fridge and spice cabinet:

3-4 stalks of scallions
Sesame oil
Chili sesame oil
Low-sodium soy sauce
Garlic powder (no fresh cloves, boo)
Chinese mustard
Vegetable broth

First I cleaned and chopped up the veggies. Mushrooms - discard stems and slice caps. Scallions - discard both ends and chop up the tenderest middle parts (green and white) into 1/4 inch pieces. Cabbage - chop into roughly 1x2 inch pieces.

I put about a tablespoon of the regular sesame oil into a skillet and heated it up. In went the mushrooms and scallions, and a few shakes of soy sauce. (It's easy to overdue this but you don't want the mushrooms to become little salt pellets, so just be careful.) I sauteed them together until they were nice and soft.

Then I took the chopped cabbage, separating out mostly just the bits with the white stalk (yummiest part, I think). Threw in a few pinches of the Oriental mustard and the garlic powder. (If I'd had fresh garlic handy, that would've gone in earlier with the scallions; que sera sera.) Also added a few shakes of the chili sesame oil to give it a bit of bite. (YMMV.)

I stirred this around over the heat until everything started to look nice and wilty. At this point I added a splash of vegetable broth to thin out the liquid.

At the end I had a crunchy, earthy, savory little lunch that could easily go with rice, if I weren't so lazy. I ended up eating it as is with a glass of iced tea.

Mm, summer.

Saturday, July 10, 2010

Black Tomato Sauce part 1

Just a quick note that enough of my tomatoes ripened that I'm making a black tomato sauce as we speak. I'll post recipe and results later.